Thirst hits hard in Arc Raiders’ Water Troubles quest, and the key to survival lies in tracking down the hidden water supply intake buried deep in hostile territory. Here’s how to trace its location, outsmart patrols, and restore the flow before everything runs dry.
Locate the Flood Access Tunnel under the Red Lake Balcony
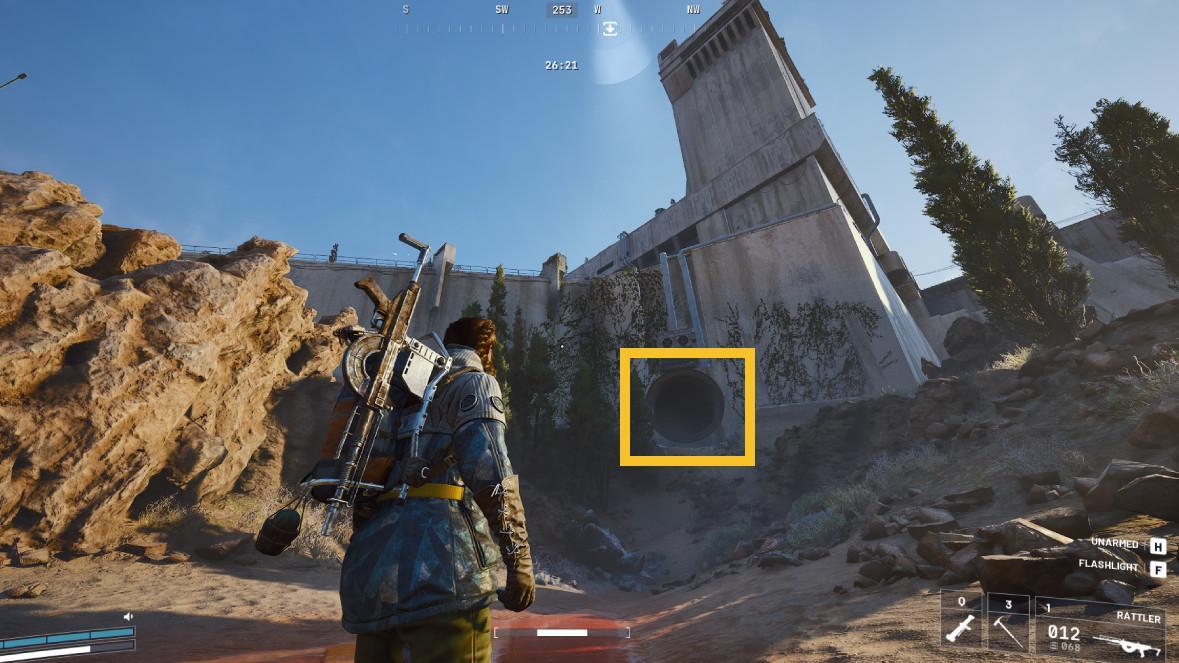
Head southeast from the Red Lake Balcony overlook toward the water’s edge. Spot the rusted metal grate partially submerged near the rocky shore, marked by a faint blue pipe snaking from the cliff base. Clear debris with your multitool to reveal the tunnel entrance, then drop inside to access the flood controls. Watch for low water levels revealing the path during dry cycles.
First up, load in Dam Battlegrounds. A Free Loadout should serve you well here, as there’s no need to bring any items back or successfully extract to complete the quest, so don’t risk losing your higher-tier gear for this one.
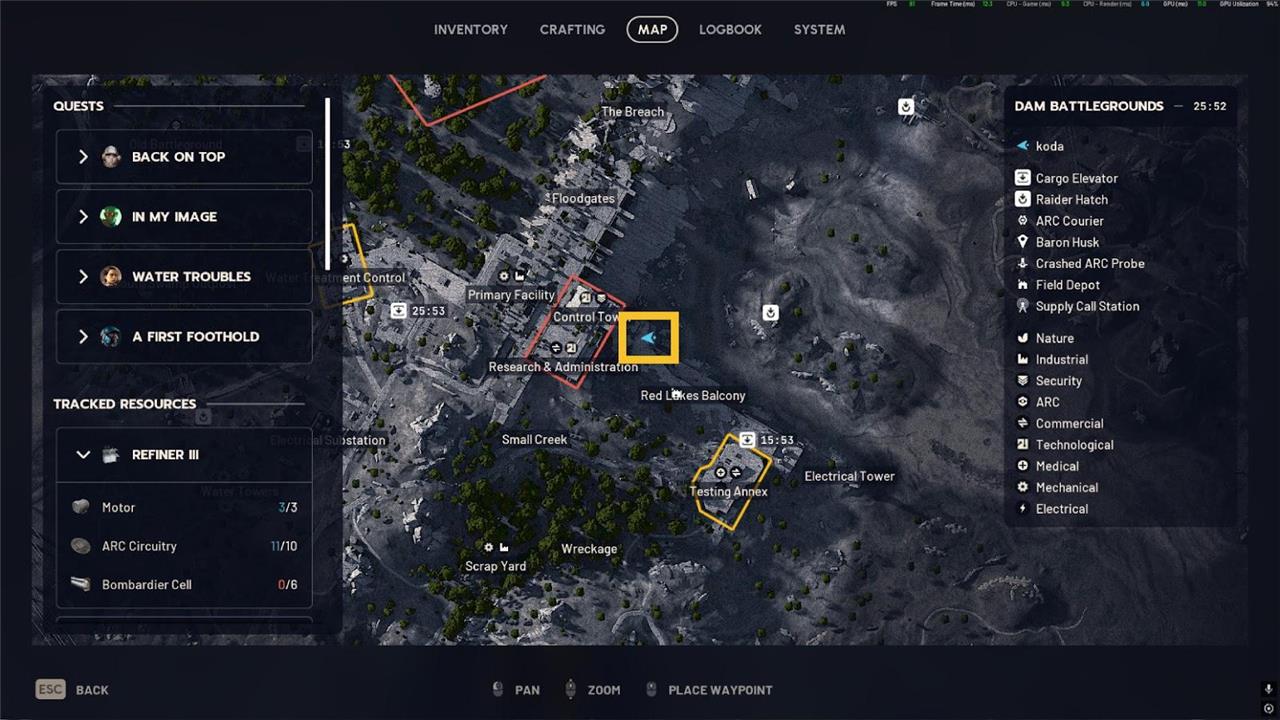
You’ll want to make your way over to the southwestern corner of the Red Lakes area in the east of the map. Specifically, you’re aiming for below the Red Lakes Balcony wall near the bottom of the Control Tower. Depending on where you spawn, getting to the Flood Access Tunnel shouldn’t take too long.
Red Lakes is a hotspot for roaming Arc, so keep an eye on the sky for potential trouble. You’ll also want to stay clear of the Red Lakes Balony Lift because it tends to attract a lot of raiders looking to extract.
Once there, you’ll find the Flood Access Tunnel in the spot marked in the map image above. It’s more or less below Control Tower, west of Red Lakes Hatch.
Find the intake to the District’s Water Supply
Head toward the old industrial district marked on your map and follow the main pipeline leading downhill. You’ll spot several broken pumps along the way-use these as landmarks until you reach a rusted intake gate near the riverbed. Clear out the enemies guarding the control panel, then interact with the valve to restore flow to the District’s water network. Make sure to scan the nearby terminal to confirm the system’s reactivation before leaving the area.

Enter the tunnel and follow it through until it opens up into a chamber with two large pipes at the back, broken scaffolding, and a collapsed gangway. At the back, you’ll see a small pipe jutting out from the large pipe on the left.
Sample the water
Test the water quality by standing near the intake valve and using your scanner to collect a sample. Watch for contamination readings or unusual color changes that indicate pollution. Once the sample is secured, the quest marker will update and direct you toward the filtration system where the next part of the mission begins.
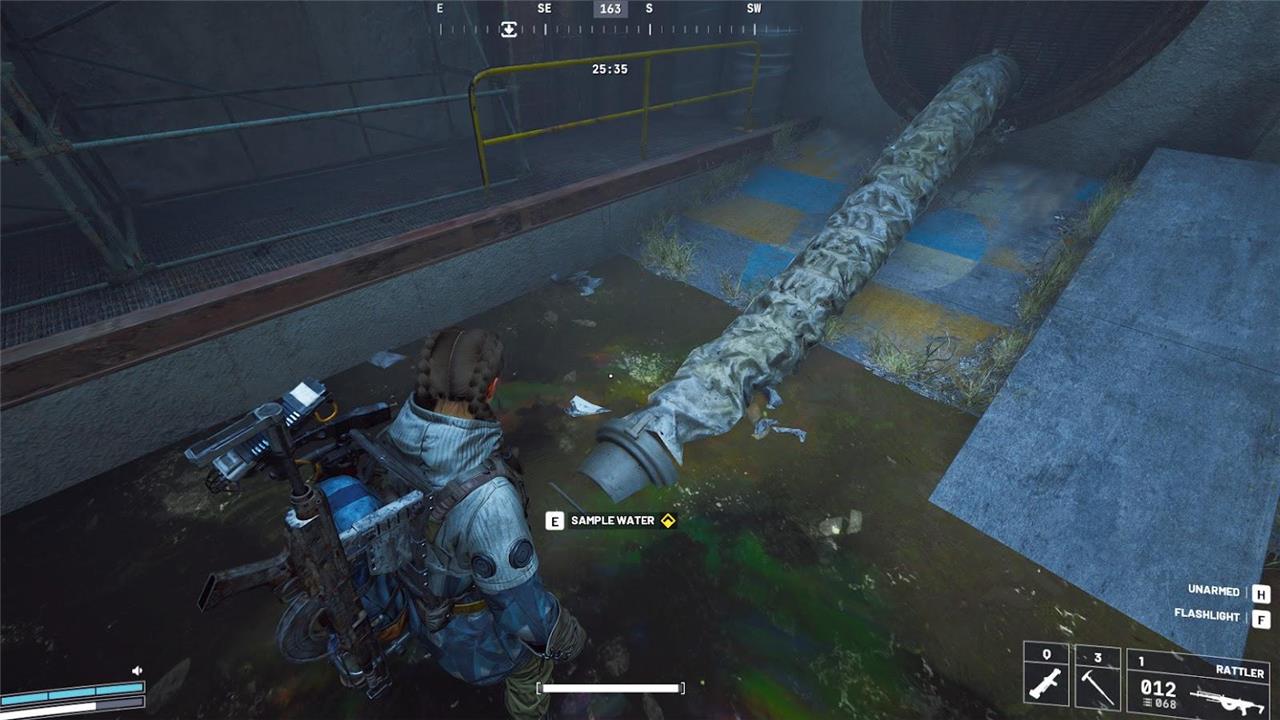
Approach the end of the pipe where it meets the water, and you’ll see a prompt to ‘Sample Water’. With the third objective complete, you’ll have wrapped up the Arc Raiders Water Troubles quest.
Source of the Contamination quest walkthrough
Source of the Contamination is a short follow-up to Water Troubles where you track down a polluted intake near the swamp and interact with a single object to finish it.
Quest basics
-
Quest giver: Celeste, unlocked after completing Water Troubles.
-
Location: Dam Battlegrounds, around the Water Treatment Building/Water Treatment Center on the dam’s north side near the swamp.
-
Objectives:
-
Reach the Water Treatment Building in the Dam.
-
Search for the Flood Spill Intake near the swamp.
-
Investigate suspicious objects.
-
How to reach the Water Treatment Building
-
Spawn into Dam Battlegrounds and head for the Water Treatment Building/Water Treatment Control icon on your map (usually on the eastern/northeastern side of the dam where it meets the swamp).
-
Approach it from the swamp side, not from high up on the dam: move along the ground level until you’re on the north side of the Water Treatment Building facing the swamp.
Example: If you open the map, place your marker just north of the “Water Treatment Control” label; that north edge where concrete slopes down into a pit is where you’re heading.
Finding the Flood Spill Intake
-
On the north side of the Water Treatment Building, look for concrete walls/ramps forming a recessed pit full of dark, polluted water right at the edge of the swamp.
-
This pit is the Flood Spill Intake: once you step into or near this area, the “Search for the Flood Spill Intake near the Swamp” objective will update.
If you’re circling the building and don’t see it, make sure you are at the low ground directly between the facility and the swamp water, not up on walkways or the main dam deck.
Investigating the contamination (barrel location)
-
Drop down into the polluted water in the intake pit.
-
In the water you’ll see a yellow/glowing barrel (or similarly highlighted container) that counts as the “suspicious object.”
-
Walk up to the barrel and interact when the prompt appears; this defuses/removes the contamination and instantly completes the quest.
You do not need to extract safely for completion to stick; once you’ve interacted with the barrel and leave the raid (even by dying), you can turn the quest in back at base.
If you tell me whether you’re having trouble finding the building, the pit, or getting the prompt on the barrel, I can give very specific “turn left/right from X landmark” instructions.
Switching The Supply quest walkthrough
Switching the Supply is a short Spaceport quest where you just need to enter the tunnels and turn a single valve; the trick is knowing the right tunnel entrance and that the valve is very close to it.
Quest basics
-
Quest giver: Celeste, unlocked after Source of the Contamination.
-
Map: Spaceport.
-
Objectives (all in one raid):
-
Find the tunnels under the Spaceport.
-
Find and turn the valve in the tunnels under Spaceport.
-
You get a blue Radio Renegade outfit color, a Spaceport Trench Tower Key, and some fuel as rewards.
How to find the tunnels under the Spaceport
-
Open your map and look at the Launch Towers in the center; you want the tunnel entrance just south/southwest of the Launch Towers, between them and the Departure/terminal buildings.
-
On the surface, look for a large hole or trench with collapsed concrete leading down into the underground ring that runs around the base of the Launch Towers.
-
Drop down the broken slab or stairs into this trench; as soon as you’re in the tunnel layer, the “Find the tunnels under the Spaceport” objective will complete.
Think of it as a circular maintenance tunnel that loops around the Launch Towers; you’re entering it from the south side rather than wandering the entire maze.
How to find and turn the valve
-
Once you land in the tunnels, do not roam far; the quest valve is very close to this first drop-in spot.
-
From where you enter, move a short distance forward and circle around the nearby collapsed concrete, checking the walls and pipes just beyond it.
-
Look for a red steering-wheel-style valve mounted on a yellow pipe on the right-hand wall (often near a small open area or by a cluster of tanks/pipes).
-
Go up to the valve and hold the interact button to turn it; the moment the interaction finishes, the quest completes.
You do not need to extract safely for the quest to count, so you can bring a cheap loadout, flip the valve, and leave however things play out.
If you tell me where you’re getting stuck (finding the entrance vs. spotting the valve on the wall), I can give a step-by-step “turn left/right” route from a specific landmark like Launch Towers or Departure building.