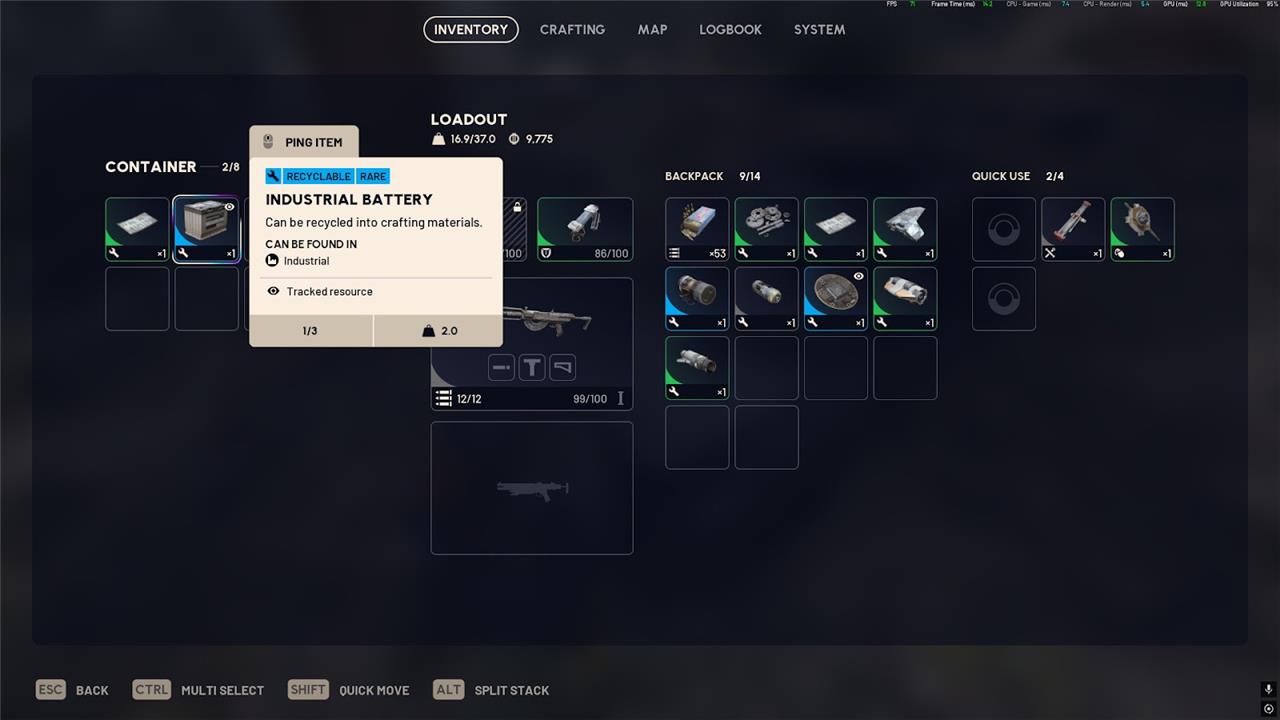
Tired of running dry on Industrial Batteries? There’s a hidden corner in Arc Raiders where they drop faster than anywhere else-and hardly anyone’s farming it yet.
Whether it’s Spaceport, The Blue Gate, or any of the other maps, it’s been a series of increasingly frustrating trudges topside with little to show for it. That is, until I came across the holy grail of farming spots and quickly hoovered up the three required for the workbench in less than a handful of runs. To save you a similarly excruciating search, here’s the perfect spot I’ve found to farm Industrial Batteries in Arc Raiders.
Where to find Industrial Batteries in Arc Raiders
You can grab Industrial Batteries by farming the cargo crate spawns near the central reactor, then checking nearby supply drops and vending machines in the surrounding warehouses for a steady trickle of drops.
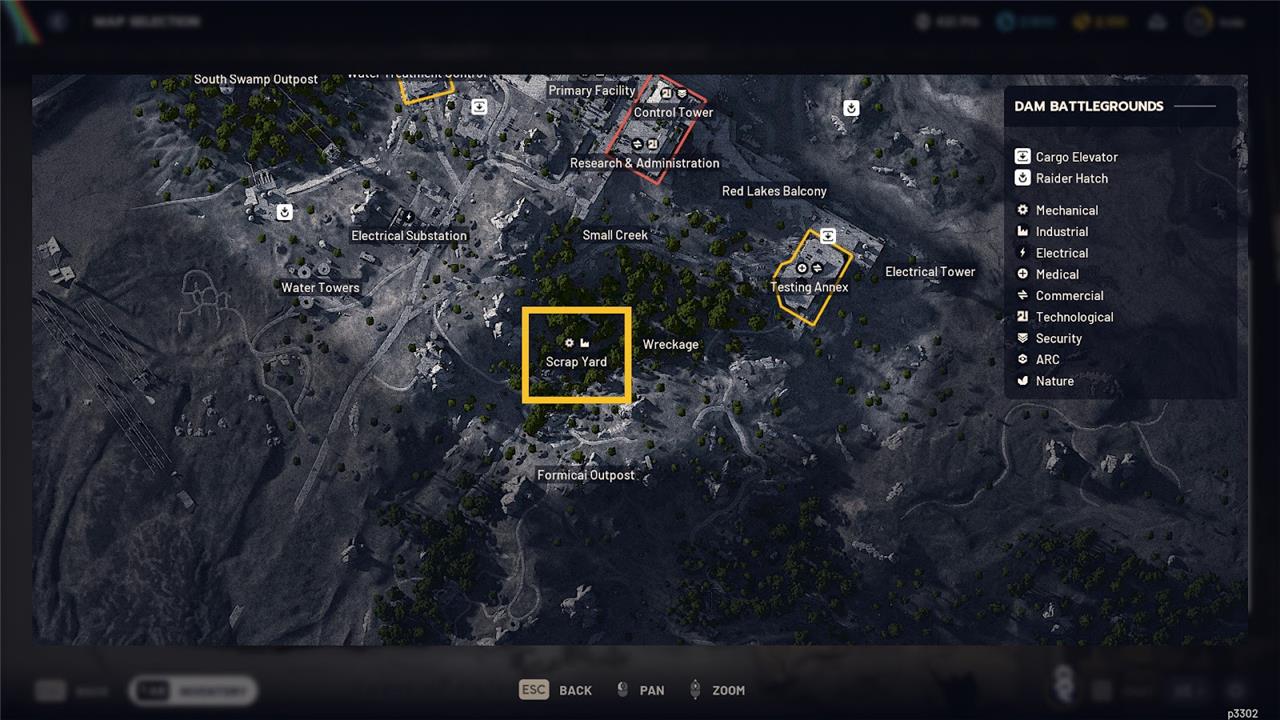
After searching in the Hydroponic Dome Complex and Power Generation Complex on Dam Battlegrounds to no avail, I open the map to look for other Industrial loot areas. Nestled in the Formicai Hills in the south of Dam Battlegrounds near the Wreckage, I notice that Scrap Yard had Industrial loot, a location I haven’t visited since my tentative first few runs as a greenhorn raider months ago.
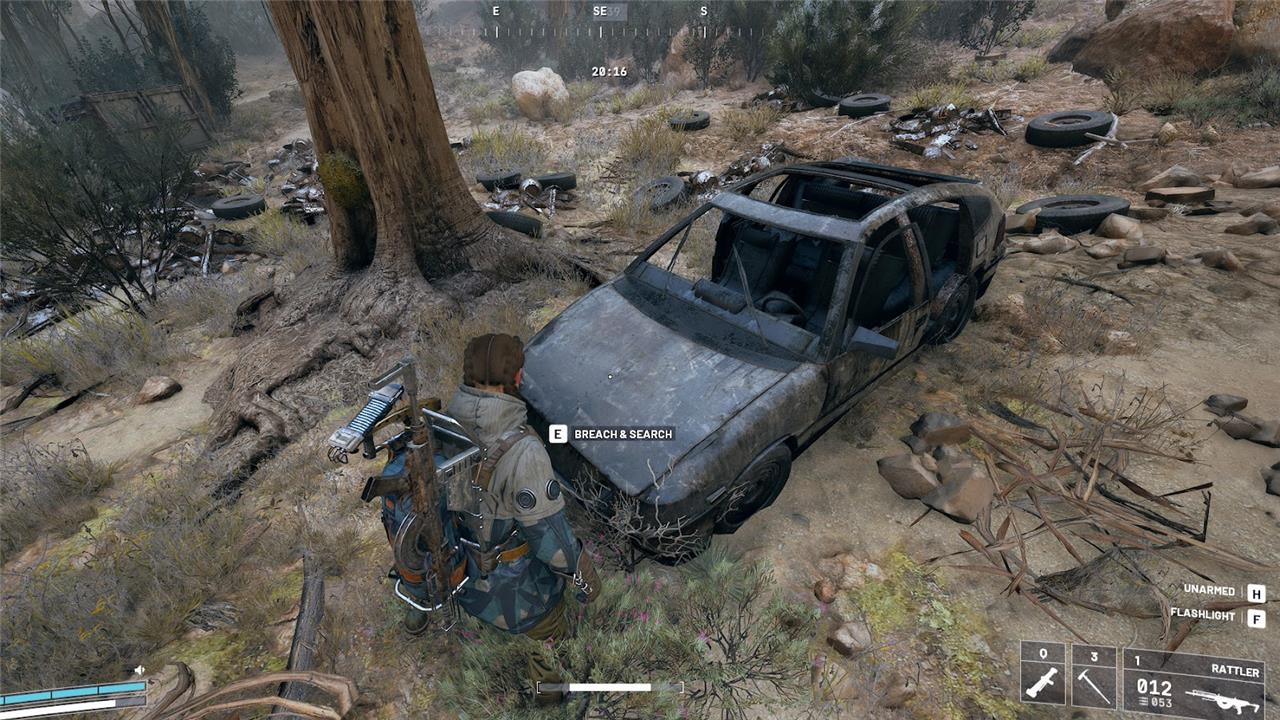
Off I go, then, to this rusty forest with little in the way of hope. It’s a bleak old place made up of abandoned industrial vehicles, piles of tyres, the odd container you can loot, and a few corroded cars. Pickaxe at the ready, I breach and search nearly every container and car hood. Nothing. I sprint over to the last car, pop open the hood, and there it is, an Industrial Battery, which I quickly place in my Safe Pocket.
I extract, return to the Scrap Yard, search the cars, and find another. I’m not so lucky on my next run, but I do loot another Industrial Battery during my next raid, then a few more during the subsequent 4-5 runs. I can finally upgrade my Gear Bench, and the hunt for those damn Industrial Batteries is over.
All this to say that if you need Industrial Batteries, the Scrap Yard is a more-or-less consistent and easy spot to farm them. Foot traffic is relatively low in the Scrap Yard, Arc enemies tend to stay clear, and it’s near quite a few spawn points on Dam Battlegrounds.
Best route to hit Hydroponic Dome and Power Generation efficiently
For fast Industrial Battery runs, treat Hydroponic Dome as your main hub and Power Generation as a short side trip, then extract without detours.
High-level route logic
-
Spawn preference: Aim for Dam Battlegrounds spawns on the eastern or central side, so you can cut straight to Hydroponic Dome without crossing Water Treatment or Testing Annex first.
-
Order of POIs: Hydroponic Dome → Power Generation Complex → nearest safe extract, skipping Water Treatment unless you specifically see it is uncontested and have extra time.
Step-by-step path
-
From spawn to Hydroponic Dome
-
From most northern or central Dam spawns, follow the main road or dirt tracks that curve toward the eastern industrial cluster; Hydroponic is slightly inland, marked by multiple white domes close together.
-
Hug cover and terrain (rock ridges, low hills) to avoid open road PvP while you approach the domes.
-
-
Clearing Hydroponic efficiently
-
Start with the outer domes closest to your entry point, then spiral inward, clearing metal shelves, lockers, and breach boxes in each dome before moving on.
-
Ignore non-industrial side rooms and long PvE pulls; your priority is fast sweeps through the dome interiors for Batteries and high-value industrial loot.
-
-
Transition to Power Generation Complex
-
Exit Hydroponic on the southern or southeastern side, then follow the short road/utility line down toward the Power Generation buildings; they sit almost directly adjacent on Dam Battlegrounds’ industrial side.
-
Use low ground and building walls as you approach; Power Generation is more open and often watched by other players.
-
-
Fast Power Generation sweep
-
Prioritize: main turbine hall, control rooms, and any visible breach lockers or metal shelving near generators and catwalks.
-
If you’ve already secured at least one Battery in your safe pocket and the area sounds busy, grab only obvious containers on your path and move on instead of fully clearing.
-
-
Extraction choice
-
From Power Generation, rotate to the nearest extract on your side of the river/dam, avoiding crossing the full map just for a preferred exit.
-
If you’re ahead on time and the raid is quiet, you can add one extra quick stop (e.g., a small field depot or roadside lockers) on the way out, but don’t loop back toward Water Treatment; that usually wastes time and increases risk.
-
Small optimizations
-
Run this as a night raid when possible to reduce long-range sightlines and make it easier to cross the open between the two POIs.
-
Always safe-pocket the first Battery you pick up, then relax and decide whether you want to stay aggressive for a second and third.
If you tell me which spawns you’re seeing most often (north dam, mid road, south), I can give a tailored mini-route from those specific spawn points into the “Hydroponic → Power Gen → extract” loop.
Best tips to avoid artillery bots in Hydroponic Dome
Artillery bots in Hydroponic Dome are easiest to deal with if you treat them like static area hazards and plan your movement around their line of sight and wind-up times.
Positioning and line of sight
-
Stay inside domes and along interior walls as much as possible; artillery bots are most dangerous when you linger in open ground between domes where they can arc shots onto you.
-
When you need to cross open space, pick a dome-to-dome line with the shortest gap and sprint it in one go instead of stopping to loot or fight mid-crossing.
-
Use tall terrain, dome structures, and cargo as hard cover; artillery shells can arc, but they still need some sky above you, so hugging large geometry cuts off their angles.
Reading their attacks
-
Listen for the audio cue and targeting delay before artillery barrages; as soon as you hear the tell, move laterally, not straight backward, to throw off their aim.
-
Never stand still after taking a shot; move two to three steps to the side before re-peeking or looting so delayed explosions don’t catch you.
-
Avoid stacking with teammates in tight areas; spread out so one barrage doesn’t chunk the whole squad at once.
Patrol and aggro control
-
Learn the rough patrol zones of the bots you usually see and route around their standard arcs instead of cutting straight through the center of the yard.
-
If you accidentally aggro one, break line of sight immediately by ducking back into a dome or behind a tall structure, then rotate around the opposite side rather than re-peeking the same angle.
-
When possible, let bots fight or distract other enemies; you can often slip past while they’re focused elsewhere.
Loadout and utility picks
-
Bring at least one mobility or defensive tool (dash, stamina booster, temporary shield) specifically for crossing exposed gaps near artillery bots.
-
Consider mid-range weapons so you’re not tempted to stand still scoping at long range; Hydroponic is mostly mid-range cover-to-cover fighting.
-
Keep your heals and plates bound somewhere quick so if you do get clipped you can top off inside the next dome without hanging around outside.
Route adjustments
-
Enter Hydroponic from the side that offers the most immediate cover from known bot positions (often the side with more dome density instead of long fencing).
-
Clear and loot domes in an order that keeps the artillery bot on the far side of the complex from you as long as possible, only approaching its zone when you’re ready to leave or rotate to Power Generation.
-
If artillery becomes overwhelming, cut the run short: safe-pocket any Industrial Batteries you already have and rotate out through the safest edge rather than forcing one more dome.
If you describe roughly where the artillery bot(s) usually camp in your runs (e.g., “between the outer domes and the road toward Power Gen”), I can suggest a tighter, dome-by-dome path that minimizes your time in their kill zone.