For days I combed every outpost and scrapyard, chasing scraps of rumor about Cooling Fans. Now the search has paid off-here’s where you can finally grab them and what to watch for before someone else claims the loot first.
It often feels like searching for a needle in a haystack, though. I was on the lookout for one across dozens of runs, and when I did find one, I naturally bumped into trigger-happy hostile raiders. Through a stroke of good luck and a bit of perseverance, I’ve stumbled across a spot that more or less always coughs up a Cooling Fan. Here’s where to find Cooling Fans in Arc Raiders.
Where to find Cooling Fans in Arc Raiders
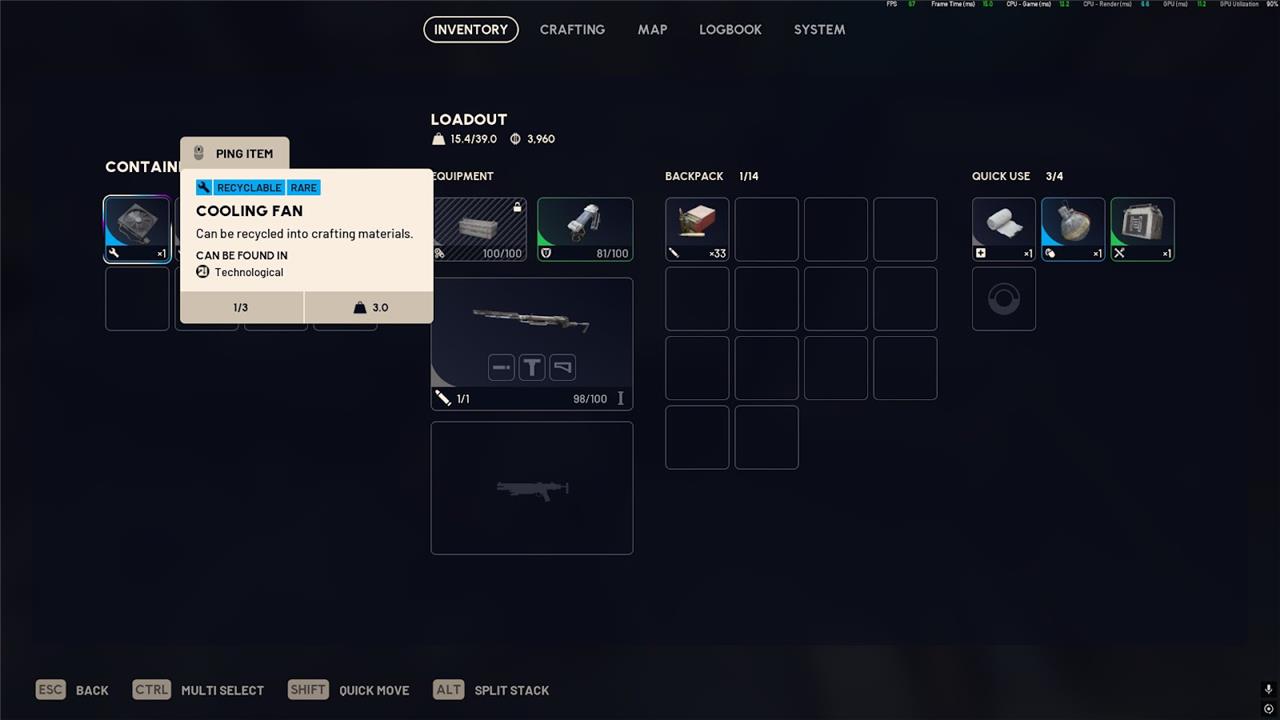
Cooling Fans are scattered across industrial zones and derelict facilities where machinery once operated at full capacity. You’ll often spot them near large generators, broken turbines, or scrap piles guarded by ARC patrols. The best chances of finding them lie in mid-level threat areas, where enemies drop mechanical parts more frequently. Keep an eye on loot chests inside maintenance buildings and storage depots-these containers often yield Cooling Fans alongside other valuable components.
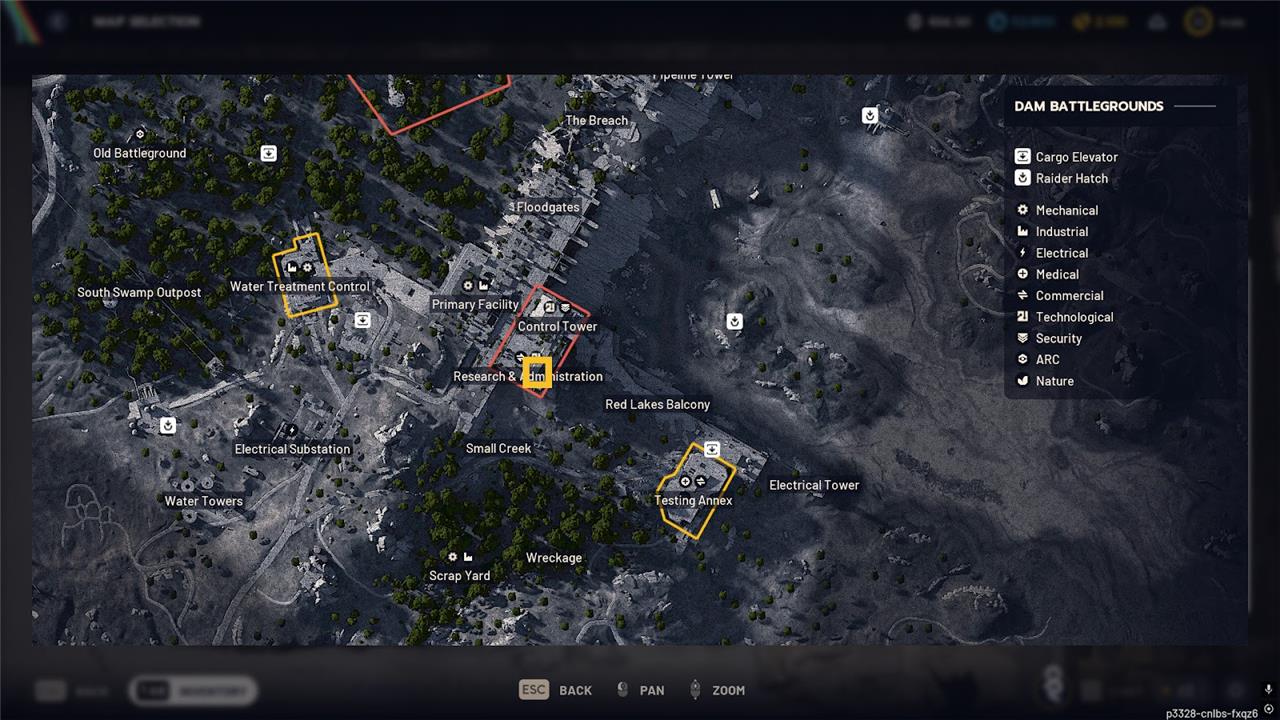
I jump into Dam Battlegrounds with two pals, who are new to Arc Raiders and hoovering early game quests. After helping them complete the A Symbol of Unification quest, we settle on the Research and Administration building for a quick loot before extracting at the Red Lakes Balcony Lift.
Most of you will know this, but from the bottom floor of the building, you can head up to the top floor via a zipline in the elevator shaft. After dealing with a few Pops and a couple of Ticks, we got to looting. It’s pretty standard stuff, other than a few valuable trinkets my squad mates can sell to increase their inventory size.
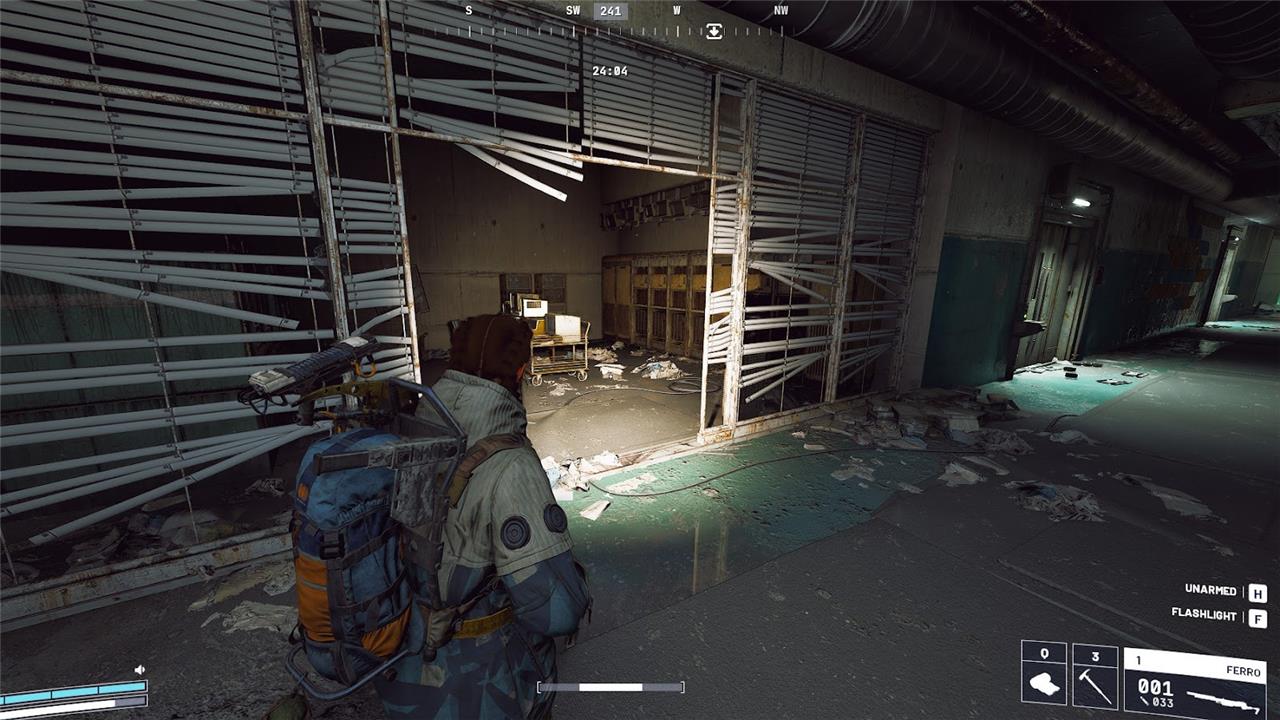
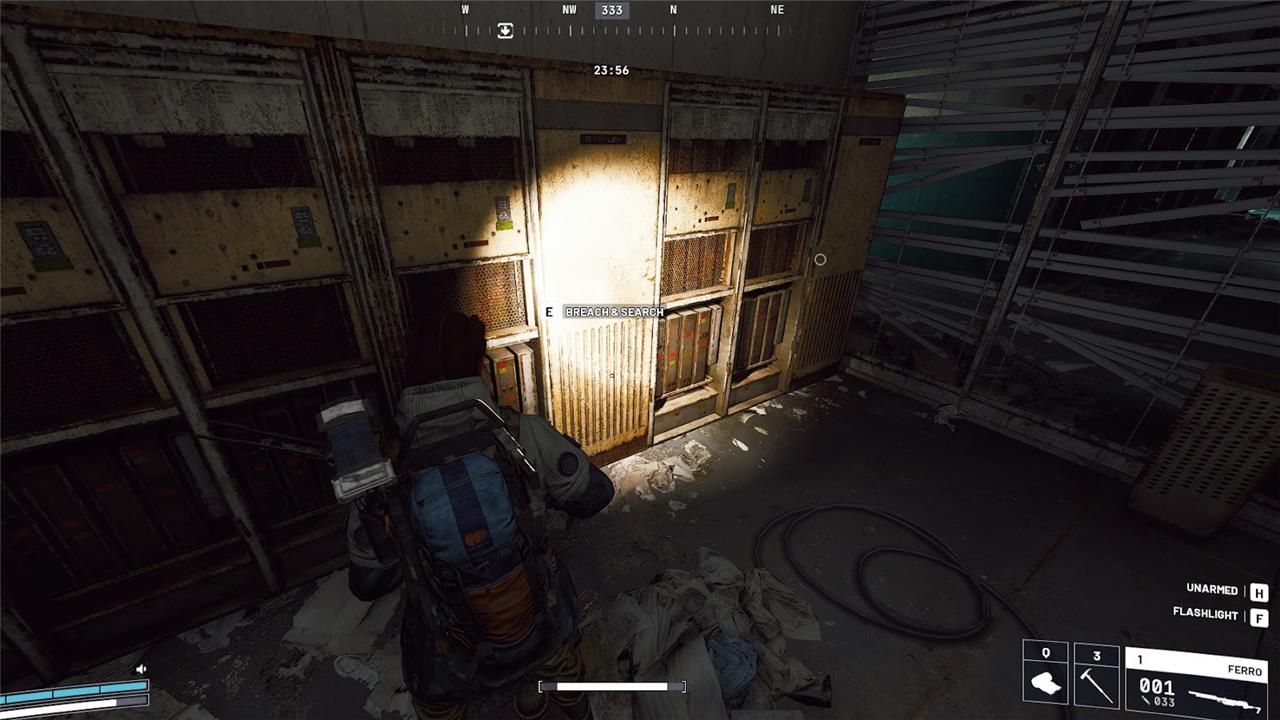
That is, until I make it towards the back part of the floor and enter a doorless server room, just next to the office space that leads to the large exterior stairwell near the southeastern tip of the building. On the right side of the room is a line of rusted server racks you can breach and search. I get to work. Nothing in the first, nor the second. But then, to my delight, the third contains one of those elusive Cooling Fans.
We quickly extract and are eager to see if this was just blind luck or a reliable farming spot, so we jump back into Dam Battleground and make a beeline for the same room in Research and Administration.
Again, I grab another Cooling Fan from the server rack. I wasn’t so lucky on the next visit, but the run after that produced yet another Cooling Fan. Before long, I’d found the fourth needed to complete stage 2 of the Expedition project.
What are the best farming routes for Cooling Fans in Dam Battlegrounds
Two main routes in Dam Battlegrounds are especially good for Cooling Fans: a fast High-Value route through the central Control Tower/Research & Administration, and a safer Industrial route through the Power Generation Complex and nearby spots.
Route 1 – Central High-Value Tower Loop (Fast but Risky)
Focus: Maximum tech cabinets in the shortest distance, high PvE/PvP risk.
-
Drop-in and approach the central High Value Loot zone that contains both the Control Tower and the Research & Administration building. Use cover because several ARCs patrol this whole plaza.
-
Enter whichever of the two buildings is least contested (north, south, east, and west sides all have entrances, so pick the quiet side) and immediately head for interior technical rooms, server rooms, and wall-mounted electrical panels.
-
Prioritize any tall server racks and breachable metal cabinets in offices and control rooms; these are your best shot at Cooling Fans in Dam Battlegrounds’ tech loot pool.
-
Clear one building quickly, then cross to the other if you still have time and plates; if you meet resistance or hear other squads, commit to just one building and extract rather than overstay.
-
Once you’ve hit the main cabinet clusters, pull back toward the nearest extraction rather than looting every side room; this route works best when you chain multiple short raids instead of one long greedy run.
Example pattern: Spawn → hug cover into central plaza → hit 2-3 cabinet-heavy floors in Control Tower → cross skybridge/ground to Research & Administration for another 2-3 cabinet rooms → exit via the safest extraction on your side of the dam.
Route 2 – Power Generation Complex 8-Minute Run (Safer Industrial Tech Loop)
Focus: Consistent tech drops with a specific Cooling Fan spawn, plus other electronics like Light Bulbs.
-
Start at a spawn that lets you reach the Power Generation Complex quickly (often via the bridge, then drop down and follow the road into the Industrial zone marked as power generation on the map).
-
Once inside the complex, move toward the central operations / control room where there are clustered server units and cabinets; one of these rooms has a well-known Cooling Fan spawn in server machinery that players hit during “8-minute” loot runs.
-
Follow an internal loop: operations room → side corridors with electrical cabinets → any rooms with large server walls or breachable boxes, ignoring generic small crates and desks.
-
If you have keys (like Raider’s Hatch key or items for the locked door), include those side rooms when they’re on your path, since they add extra high-value electronics and sometimes a Cooling Fan without much extra risk.
-
Finish the loop by heading straight to a nearby extraction (often via the hatch/elevator routes tied to the complex); aim to be in and out in under 10 minutes so you can reset and run the route again.
This route shines when you want repeatable, lower-profile runs: it’s less central than the Control Tower, so you see fewer players but still tap an Industrial/Electronics area where Cooling Fans can drop from tech containers.
Bonus – Lesser-Known Dam Spots
If the main areas are picked clean or too hot, you can layer in these locations.
-
Generator Lift yellow-loot area near
Best loadout for farming Cooling Fans in Dam Battlegrounds
For farming Cooling Fans in Dam Battlegrounds, prioritize a mobile, mid-range build that clears indoor ARCs quickly, survives third parties in High-Value zones, and leaves plenty of room to carry loot instead of heavy utilities.
Core Weapon Setup
-
Primary: A reliable mid-range rifle or DMR (good iron/1x-2x sight, low recoil) so you can fight comfortably in Control Tower and Research & Administration hallways without overcommitting to close range.
-
Secondary: Fast-handling SMG or shotgun for stairwells, server rooms, and door pushes where you often surprise or get surprised by other players.
-
Melee: Light melee or knife purely for emergencies; you want to avoid meleeing in tight PvE/PvP stacks and save stamina for repositioning.
Armor, Gadgets, and Healing
-
Armor: Medium armor is the sweet spot; heavy makes you too slow for in-and-out farming routes, while light armor gets shredded if you get pinned in Control Tower or Power Generation Complex.
-
Gadgets: Bring at least one stun or frag for clearing ARCs clustered around server rooms plus one smoke or flash for disengaging from squads camping extractions or staircases.
-
Healing: Carry mostly cheap heals and bandages with one stronger heal; these runs are about quick resets rather than long fights, so don’t overpack meds and lose bag space.
Support Items and Tools
-
Breach / lock tools: Always bring enough breaching tools or equivalent to guarantee you can open every tech cabinet or locked door on your chosen route (especially in Power Generation Complex and upper Research & Administration).
-
Keys: If you own a Raider’s Hatch key or similar, include it; several popular Dam routes chain guaranteed high-value electronics (Light Bulbs, Cooling Fans, Heat Sinks) behind locked areas.
-
Ammo and utilities: Take one to two stacks of primary ammo and a small stack of secondary; favor extra breaching tools or utility over carrying more than two full stacks of ammo.
Backpack and Risk Level
-
Backpack size: Use at least a medium backpack so you can scoop multiple electronics, a couple of weapons, and some crafting materials before extraction.
-
Risk profile: If you are running the 8-minute Power Generation Complex route or central High-Value loop, treat the loadout as “semi-budget”: good enough to win a fight, but not your absolute best kit so you don’t hesitate to reset if it goes wrong.
Example Solo Dam Battlegrounds Fan-Farm Loadout
-
Primary: Accurate assault rifle with 1x-2x optic, compensator, and extended mag.
-
Secondary: High-ROF SMG with laser for hip-fire in stairwells and server rooms.
-
Armor & gear: Medium armor, medium helmet, medium backpack, 2 frags/stuns, 1 smoke, 4-6 light heals, 1 strong heal.
-
Tools: 3-4 breaching/lock tools, any key that opens Dam Battlegrounds tech or hatch rooms, 1-2 stacks primary ammo, 1 stack secondary.
If you tell me whether you usually play solo or in a duo/squad, I can tighten this into a more specific “slot-by-slot” loadout (exact counts of heals, gadgets, and tools) tuned to your preferred route.