Rusted Shut Medical Kits are among the rarest supplies in Arc Raiders, tucked away in forgotten outposts and guarded caches. Knowing the right zones to search and what signs to follow can mean the difference between surviving your next raid or limping back empty-handed.
Rusted Shut Medical Kits spawn in areas marked as containing Medical loot, giving you quite a few options on several maps, but some areas have better spawn rates and should be prioritized. In this guide, we’ll walk you through where to find Rusted Shut Medical Kits in Arc Raiders for the Medical Lab III upgrade.
How to get Rusted Shut Medical Kits in Arc Raiders
Rusted Shut Medical Kits spawn in medical points of interest across Arc Raiders maps. Head to the Hospital in northern Buried City, a multi-floor structure packed with lootable rooms and beds where kits frequently drop. Check the Testing Annex in southeastern Dam Battlegrounds next, searching drawers, lockers, and hospital areas for reliable finds amid potential enemy spawns. Additional spots like Research, Piazza Arbusto, and Plaza Rosa in Buried City offer chances, though Hospital and Testing Annex yield the most. Stash kits in your Safe Pocket right away since they prove scarce.
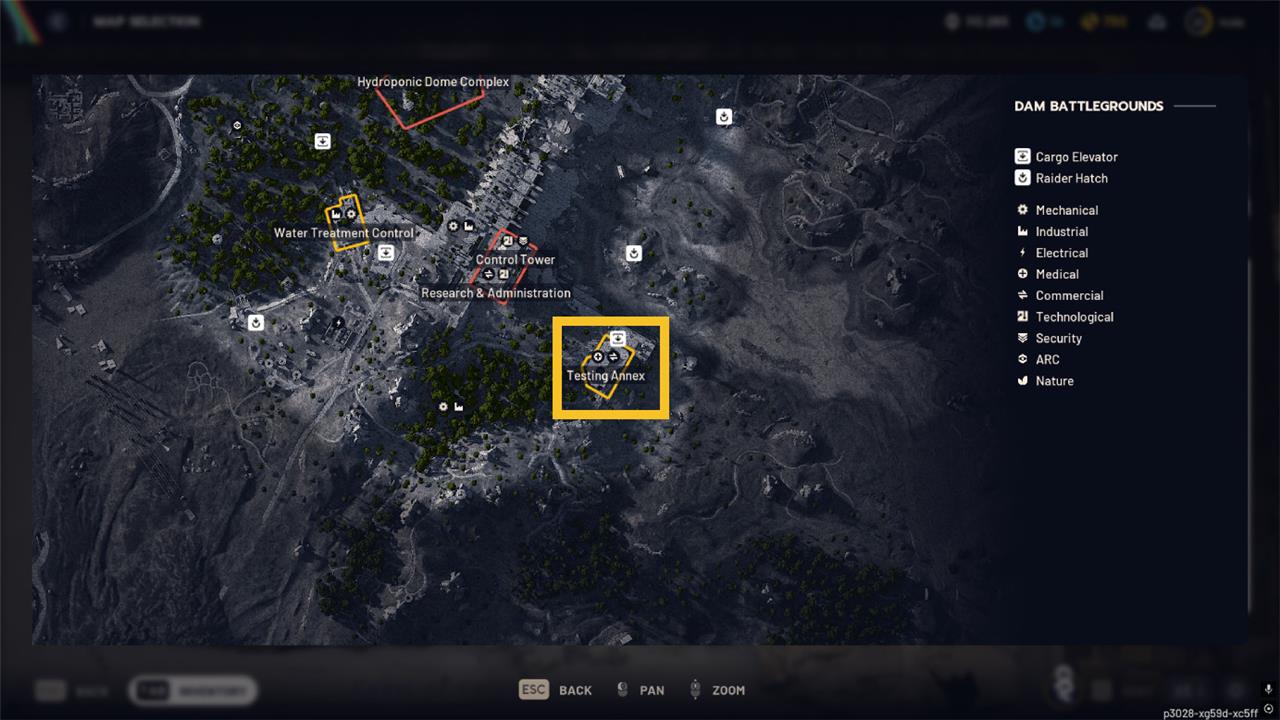
To find Rusted Shut Medical Kits in Arc Raiders, you’ll need to search Medical loot buildings and areas. The best place we’ve come across to reliably find them is Testing Annex in Dam Battlegrounds. It’s the large square building located in the southeast of the map, on the border with Red Lakes.
They spawn in containers, drawers, and cabinets, as well as occasionally on desks, research stations, and chemical racks. Drawers are your best bet here, along with containers that you need to breach and search. They appear as rusty rectangular boxes. To make finding them easier, it’s worth tracking them back in Speranza so that you see the little eyeball symbol next to them when looting. Just watch out for the Fireballs that roam the corridors.
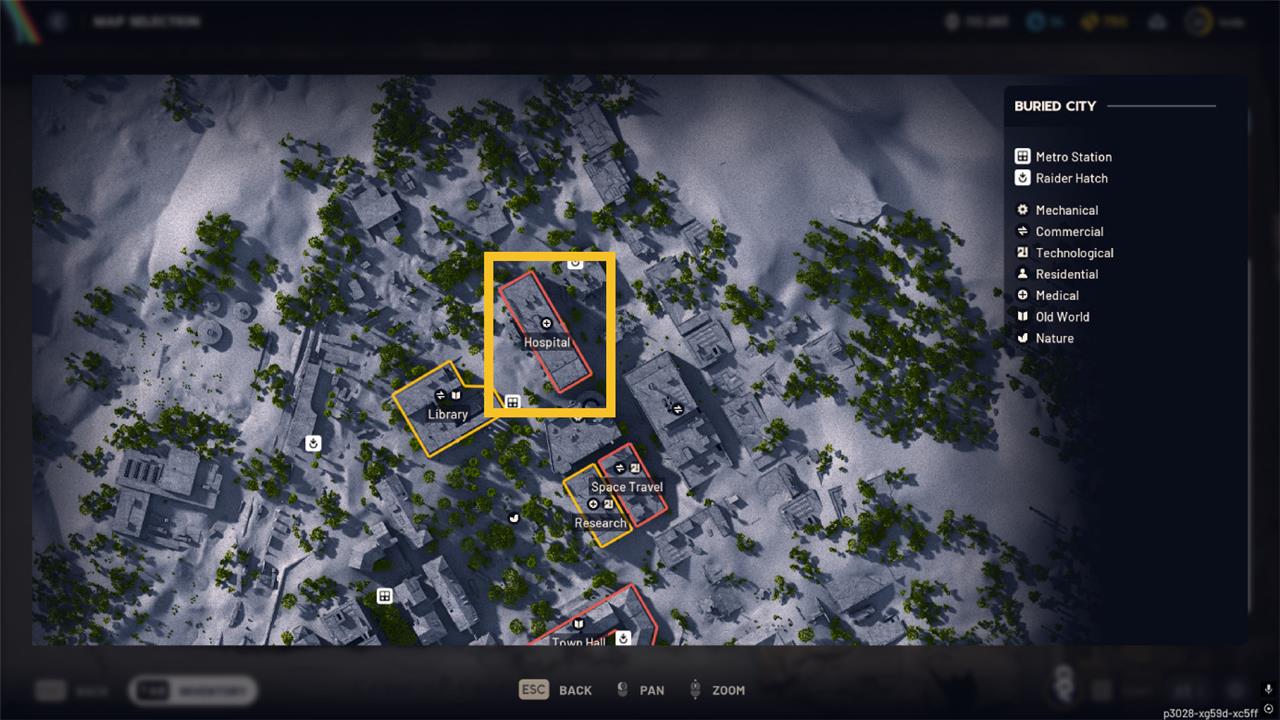
Other than Testing Annex, the Hospital in Buried City is another reliable spot, especially the upper floors. The only snag here is that the Hospital gets a lot of foot traffic, so you’ll likely be competing with other raiders for Rusted Shut Medical Kits.
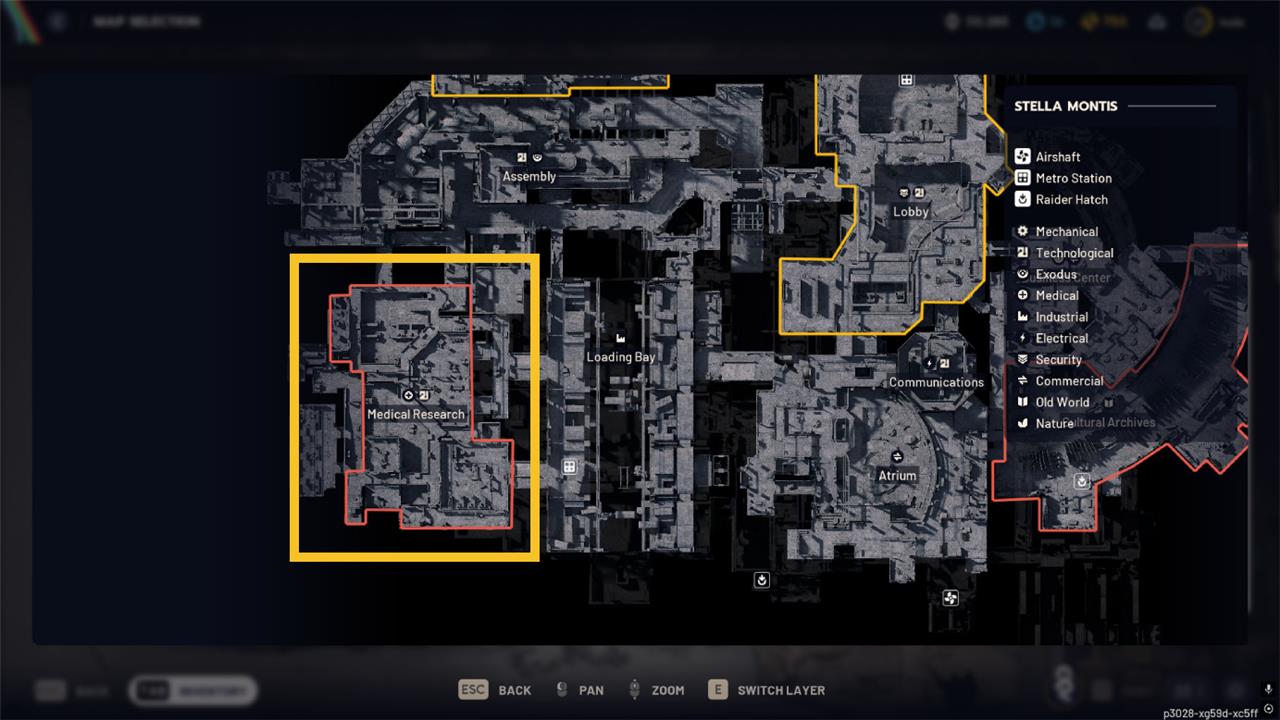
Image credit: Tom Bardwell for Gamer4K, Embark Studios
Otherwise, Medical Research on Stellis Montis is a veritable trove of Rusted Shut Medical Kits, but again, it’s heavily contested, and the map itself is more-or-less guaranteed to cough up heated PvP encounters. That said, if you do venture out that way, you can always take a Free Loadout if you’re worried about losing precious loot. However, you’re better off with the relative calm of Testing Annex.
Best routes to farm medical loot per map in ARC Raiders
For medical loot, the most efficient approach is to run short, repeatable routes that chain together medical POIs (clinics, pharmacies, hospitals, labs) and end near a safe extract on each map.
Dam Battlegrounds
-
Run a circuit starting from Wreckage/Old Battleground, then sweep Testing Annex and any nearby med tents or field clinics before heading to a close extract. These areas have clustered medical duffel bags, shelves, and high-value containers that can drop meds, blueprints, and Rusted Shut Medical Kits.
-
At night, include the Power Rod room and nearby indoor facilities; hit all med bags on the way, then rotate toward Floodgates or The Breach for extraction while checking any remaining med containers.
Buried City
-
New District west-to-east route: start around Space Travel hub, cut through Research, then finish at Town Hall, looting every med bag and clinic room you pass. These three locations are dense interior spots with drawers, cabinets, and med bags that frequently spawn higher-tier medical loot.
-
Pharmacy chain: route Plaza Rosa Pharmacy → nearby side-street med rooms → Piazza Arbusto Pharmacy, then extract via a zipline or nearby exit while avoiding the busiest streets. Both pharmacies are full high-value interiors where nearly every cabinet and shelf can spawn meds and blueprints.
Spaceport
-
Run Departure Building → Arrival Building → Launch Towers on the top-left of the map, clearing every infirmary, med bay, and wall med bag you see. These buildings combine medical duffels with high-value containers, so you get meds while also rolling for rare loot and blueprints.
-
On the lower-right, chain Control Tower A6 → Container Storage, focusing on interior med rooms and any marked medical closets before rotating out through a perimeter extract. This keeps you mostly indoors with consistent medical containers and lower PvP exposure along the edges.
The Blue Gate
-
Start at Pilgrim’s Peak in the top-right, sweeping any clinics or infirmary areas plus outdoor med bags, then move down toward the central Checkpoint. Both locations have strong high-tier loot pools, and med bags along the way let you top up meds while you move between them.
-
Use ridge lines and catwalks where possible, dropping into buildings that show medical signage; loot, then quickly rotate back to high ground towards your chosen extract. This keeps your route safe while still hitting compact medical interiors and loose med spawns.
Stella Montis
-
Focus on the central industrial interiors such as assembly or research wings, hitting any infirmaries or med rooms inside as you cross the complex. These rooms tend to stack med bags and cabinets alongside other high-value containers, making each stop efficient for both meds and rare loot.
-
Add one “hidden” indoor stop (like a maintenance or assembly side-room with med bags) before rotating straight to an extract, repeating the same short loop each raid. Keeping the path short and mostly indoors increases survival and makes medical farming more consistent over multiple r
Safe low-risk medical loot route for Buried City
A good low-risk medical route in Buried City stays on the edges, focuses on quieter interiors, and uses rooftops/zip-lines to avoid main streets. The goal is to hit 2-3 solid medical/blueprint spots, then extract early instead of crossing the whole map.
Core route concept
-
Stay on the southern and western edges (around Abandoned Highway/Marano Station side) instead of pushing deep into Plaza Rosa or Hospital, which are much hotter. These edge areas still have high-value interiors and med bags but see less constant PvP than central hubs.
-
Use rooftops, balconies, and interior stairwells as your main path, only dropping to street level to cross narrow gaps or reach an extract. This line-of-sight control is what makes the route “low-risk” even when you’re in decent loot zones.
Example safe loop (west side)
-
Start near Abandoned Highway Camp / western apartments and clear the breachable building with drawers and filing cabinets; it often holds high-value loot including meds and blueprints but is usually quiet. Then move building-to-building through upper floors and stairwells, looting residential bathrooms, kitchen cabinets, and any med bags you spot.
-
From there, angle toward Marano Station roofs, using train roofs and catwalks to hit hidden weapon/loot containers and occasional med spawns without spending much time on the platforms below. Once your bag is half-full, rotate back along rooftops toward a nearby extract instead of pushing deeper into the city center.
Safer eastern option
-
If you spawn east, skip Plaza Rosa Pharmacy at peak times and instead work the side streets and upper floors around it, hitting smaller shops and residential interiors with med bags and drawers. These “off-angle” buildings are notably less contested than the pharmacies but still share the same general loot pool for meds and general supplies.
-
Finish at a quiet extract on the perimeter, listening before you drop to street level; if it sounds busy, rotate one block over and use a different exit instead of forcing a fight.
Practical tips to stay safe
-
Take one clear objective (fill meds / grab 1-2 high-value containers), then extract; don’t turn a safe route into a full-map tour.
-
Avoid known hotspots like Hospital and the busier pharmacy during peak raid times; run those only when the raid feels empty or late.