Master Anno 117 Pax Romana’s factories with exact production ratios that turn chaos into Roman prosperity.
The overall benefit of having optimal production chains is that buildings don’t linger idle waiting for resources, and each one is working at peak efficiency consistently. This, in turn, means a steady flow of goods to sate your denizens and even partake in trade to stock up your coffers with Denarii. In this guide, we’ll walk you through the optimal production ratios for each supply chain in Anno 117 Pax Romana.
Production ratios explained
Production ratios determine how many input goods are needed to maintain steady output and prevent shortages across your settlements. Each production chain in Anno 117: Pax Romana follows a specific balance that keeps workshops and farms running at full capacity without wasting resources. Understanding these ratios lets players synchronize input and output buildings, ensuring smooth trade routes and stable growth across provinces.
Put simply, production ratio is the optimal number of buildings of different types in a supply chain to ensure none of them are missing resources and there isn’t a raw material surplus at any time. This ensures the final product in the chain is produced as fast and as efficiently as possible with no downtime. The idea is to consider the processing time of each building to determine the optimal number of each required.
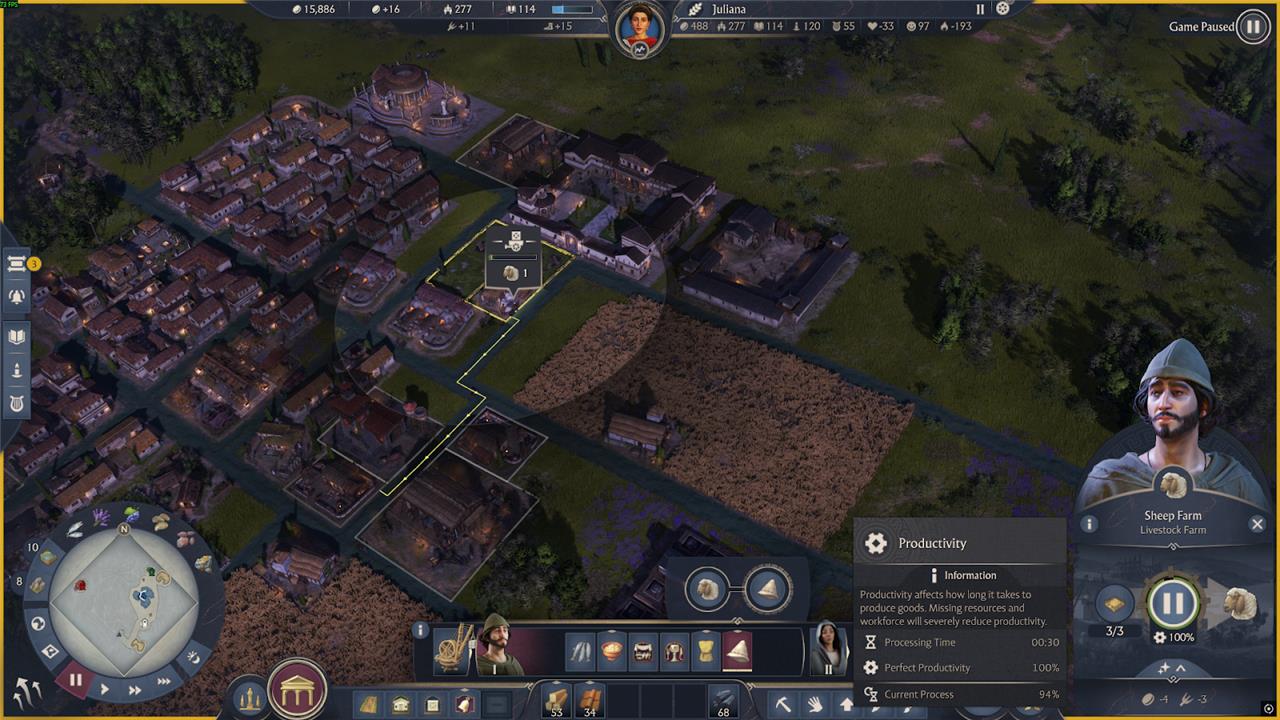
An example is the best way to explain production ratios. A Sheep Farm takes 30 seconds to produce 1t of Sheep, while Pileus Felter takes 60 seconds to produce 1t of Pileus from 1t of Sheep. What this means is that for every 1t of Pileus you produce, you’ll have a surplus of 1t of Sheep. To optimise the Pileus production chain, you’ll want two Pileus Felters using 2t of Sheep to produce 2t of Pileus every 60 seconds. The 1t of Sheep produced every 30 seconds (or 2t every 60 seconds) by the Sheep Farm is therefore used.
It also works the other way around, where not enough of a raw material is produced to keep up with the production time of buildings further down the supply chain. In other words, ratios let all the buildings in a supply chain keep up with one another’s processing time.
Note that this assumes that you’ve attained and maintained 100% perfect productivity for each building. These ratios are also affected by Specialist buffs and perks as well as research benefits, but as these are so varied and player-dependent, we won’t factor them in here.
Anno 117 Pax Romana Production ratios
Production ratios in Anno 117 Pax Romana balance building counts against processing times to match supply chains without waste or shortages. For Plebeian goods, 1 Clay Pit, 1 Charcoal Burner, and 2 Tilers produce tiles steadily. Bread needs 2 Wheat Farms, 1 Grain Mill, 1 Charcoal Burner, and 2 Bakeries. Garum requires 1 Salt Ponds, 2 Scomber’s Shacks, and 3 Garum Works, while Sandals use 1 Pig Farm, 1 Salt Ponds, 2 Tanneries, and 4 Sandal Makers. Patrician items like Mosaics demand 3 Mineral Quarries, 4 Mineral Crushers, 2 Clay Pits, 2 Charcoal Burners, and 8 Tessera Works. Province-specific chains, such as Latium’s 6 Concrete Mixers from 2 Limestone Quarries and 3 Sand Refineries, fine-tune output for population tiers.

Here are the production buildings for all buildings on both the Latium and Albion maps:
| Needs/Goods | Latium Production Ratio | Albion Production Ratio |
|---|---|---|
| Timber | x1 Woodcutter, x1 Sawmill | x1 Woodcutter, x1 Sawmill |
| Porridge | x1 Oats Farm, x1 Porridge Stand | n/a |
| Tunic | x1 Hemp Farm, x1 Spinner | x1 Hemp Farm, x1 Spinner |
| Pileus | x1 Sheep Farm, x2 Pileus Felter | n/a |
| Tiles | x1 Clay Pit, x1 Charcoal Burner, x2 Tilers | x1 Charcoal Burner, x3 Mud Driers, x2 Tilers |
| Bread | x2 Wheat Farms, x1 Grain Mill, x1 Charcoal Burner, x2 Bakeries | n/a |
| Garum | x1 Salt Ponds, x2 Scomber’s Shack, x3 Garum Works | n/a |
| Sandals | x1 Pig Farm, x11 Salt Ponds, x2 Tanneries, x4 Sandal Makers | n/a |
| Soap | x1 Pig Farm, x1 Charcoal Burner, x2 Renderers, x4 Lavender Growers, x2 Soap Makers | n/a |
| Amphorae | x1 Clay Pit, x2 Resin Tappers, x1 Charcoal Burner, x2 Potters | x3 Mud Driers, x2 Resin Tapper, x1 Charcoal Burner, x2 Potter |
| Olive Oil | x4 Olive Growers, x3 Olive Presses | n/a |
| Concrete | x2 Limestone Quarries, x3 Sand Refineries, x6 Concrete Mixers | x2 Limestone Quarries, x3 Sand Refineries, x6 Concrete Mixers |
| Wine | x2 Vineyards, x1 Apiary, x1 Vintner | x4 Vineyards, x1 Apiary, x1 Vintner |
| Togas | x3 Flax Farms, x3 Snaileries, x4 Weavers, x4 Dye Works, x2 Loom Weaveries | n/a |
| Writing Tablets | x3 Apiaries, x6 Sandarac Nurseries, x8 Tabuli | n/a |
| Fine glass | x3 Mineral Quarries, x3 Sand Refineries, x4 Mineral Crushers, x6 Glass Smelters, x4 Charcoal Burners, x8 Glassblowers | n/a |
| Marble | x2 Marble Quarries, x3 Marble Masons | n/a |
| Mosaics | x2 Clay Pit, x3 Mineral Quarry, x4 Mineral Crusher, x9 Tessera Works | n/a |
| Oysters with Caviar | x3 Oyster Bed, x4 Sturgeon Hatchery, x3 Fish Gutter, x2 Epicure of Water | n/a |
| Loungers | x3 Apiaries, x6 Sandarac Nurseries, x8 Tabuli | n/a |
| Necklaces | x4 Gold Washers, x1 Goldsmiths, x1 Mineral Quarry, x1 Charcoal Burners, x2 Jewellers | n/a |
| Lyres | x4 Gold Washers, x1 Sheep Farm, x2 Stringers, x2 Sandarac Nurseries, x1 Goldsmith, x1 Charcoal Burner, x1 Gilder, x1 Lythier | n/a |
| Armor | x1 Iron Mine, x2 Furnace, x1 Pig Farm, x1 Salt Ponds, x2 Tannery, x3 Armorer | x1 Iron Mine, x2 Furnace, x1 Pig Farm, x1 Salt Ponds, x2 Tannery, x3 Armorer |
| Weapons | x1 Iron Mine, x2 Furnace, x3 Weaponsmith | x1 Iron Mine, x2 Furnace, x3 Weaponsmith |
| Ropes | x1 Hemp Farm, x2 Ropemaker | x1 Hemp Farm, x2 Ropemaker |
| Sails | x1 Sheep Farm, x3 Sailmakers | x1 Sheep Farm, x3 Sailmakers |
| Reed Shoes | n/a | x1 Reed Gatherer, x2 Shoe Weaver |
| Wattle & Daub | n/a | x3 Mud Driers, x2 Reed Gatherers, x2 Labourer’s Yards |
| Cheese | n/a | x1 Ochs Farm, x2 Dairies |
| Beer | n/a | x2 Barley Farms, x1 Malthouse, x2 Brewries, x1 Charcoal Burner |
| Roast Beef | n/a | x2 Ochs Farms, x1 Charcoal Burner, x3 Saltwort Pickers, x4 Earth Ovens |
| Trousers | n/a | x1 Sheep Farm, x2 Weld Crops, x3 Hosiers |
| Torcs | n/a | x1 Copper Mine, x3 Wire Twisters, x1 Charcoal Burner |
| Clan Shields | n/a | x2 Weld Crop, x1 Tin Mine, x1 Copper Mine, x2 Bronze Smelter, x3 Shieldbeater |
| Drinking Horns | n/a | x1 Tin Mine, x2 Ochs Farm, x4 Horners |
| Granite | n/a | x3 Granite Quarries, x 8 Granite Cutters |
| Fur Hats | n/a | x3 Saltwort Pickers, x2 Saltwort Burners, x1 Charcoal Burner, x3 Beaver Trappers, x4 Beaver Hatters |
| Bird Tongues in Aspic | n/a | x3 Bird Charmers, x1 Pig Farm, x1 Charcoal Burner, x2 Renderers, x4 Tongue Pluckers, x3 Epicures of Air |
| Sausages | n/a | x1 Pig Farm, x3 Herb Garden, x2 Salsicium |
| Brooches | n/a | x1 Silver Mine, x2 Silver Forge, x2 Charcoal Burners, x4 Fibularium |
| Cloaks | n/a | x2 Weld Crops, x1 Copper Mine, x1 Sheep Farm, x3 Greenhands, x2 Birrus Stitchers |
| Handmirrors | n/a | x1 Silver Mine, x2 Silver Forges, x2 Charcoal Burners, x3 Shell Gatherers, x4 Narcissiums |
| Chariots | n/a | x1 Woodcutter, x2 Reed Gatherers, x3 Chassis Builders, x2 Horsecatchers, x4 Chariot Workshops |
| Wigs | n/a | x4 Horse Breeder, x3 Flax Farm, x2 Resin Trapper, x4 Headpiece Maker, x3 Wig Maker |
Best Timber production layout for early game
Early-game timber production in Anno 117: Pax Romana focuses on compact, efficient chains using 1 Woodcutter (30s cycle) feeding 1 Sawmill (30s cycle) for a perfect 1:1 ratio. This setup meets Liberti needs without workforce strain. Prioritize fertile forest tiles and road access to a warehouse. [conversation_history]
Basic Layout (1 Chain)
Place buildings in a straight line or L-shape for minimal space (about 10×10 tiles total).
-
Woodcutter adjacent to trees, output road to Sawmill input.
-
Sawmill output road to warehouse or direct consumer.
-
Handles 1t/min steady output; scale to 2-4 chains as population grows.
Early Scaling (x4 Chains)
Use Anno Companion’s Timber x4 layout, requiring Woodland Rebirth discovery for optimal tree density.
-
Central warehouse with roads on all sides.
-
Four Woodcutter-Sawmill pairs around it, each pair tight-packed.
-
Fits in 20×20 area, exits roads flexibly; boosts to 4t/min.
Tips
Unlock discoveries early for density buffs. Avoid overbuilding-monitor workforce via trade routes. Connect only to needed buildings to save slots.
Show compact 4-hut timber stamp for early game
Compact 4-hut timber stamps in Anno 117: Pax Romana deliver 4t/min output for early Liberti expansion using four Woodcutter-Sawmill pairs in minimal space. This “stamp” design packs tightly around a central warehouse on forest tiles. It scales from 1-2 pairs initially without workforce issues.
Core Layout Design
Arrange in a 20×20 footprint with roads forming a cross through the center.
-
Four Woodcutters at cardinal points, each harvesting adjacent trees (30s cycle).
-
Four Sawmills inward-facing toward the central warehouse (30s cycle).
-
Single warehouse in middle collects all Timber; extend roads to trade route or consumers.
Placement Steps
-
Unlock Woodland Rebirth for tree density if available.
-
Build cross-roads first (10 tiles long each arm).
-
Position Woodcutters at road ends, rotate for tree access.
-
Snap Sawmills to inner road spots feeding warehouse.
-
Test efficiency at 100% via building stats before expanding.
Optimization Notes
Add Fire Station centrally if needed for coverage. This beats scattered singles by saving warehouse slots. Upgrade to 8-hut later for Plebeians. [conversation_history]